Monday, December 17, 2012
Silhouette Cameo
Right now on amazon.com they have a Silhouette Bundle for 209.99 with no tax and free shipping. It is a lightning deal so you will have to hurry fast. I have never seen it lower than this!!! If you want this for Christmas here's your chance!!!!! http://www.amazon.com/gp/product/B007Q36K1C/ref=gb1h_tit_c-3_3682_A1WWNTBMPBP194?smid=ATVPDKIKX0DER&pf_rd_m=ATVPDKIKX0DER&pf_rd_t=101&pf_rd_s=center-3&pf_rd_r=1H565FA9Y8D3CG7WP223&pf_rd_i=5550343011&pf_rd_p=1438543682
Wednesday, October 31, 2012
Birthday Owl
This card was created using the Create a Critter Cricut Cartridge. The owl was cut at 5.5". All the cardstock is from Stampin' Up and the color combo's are Rich Razzleberry, Daffodil Delight, Tempting Turquoise and Pacific Point! All edges were inked with coordinating ink. The branch was cut from the Cricut Cartridge Hoot 'n Holler at 3.24", I only used 3 of the 4 layers, and the colors used there are Early Espresso, Wild Wasabi and Garden Green.

The background is Daffodil Delight and was embossed using the Cuttlebug folder D'vine Swirl. I then inked the embossing with a Daffodil Delight ink dauber.

The sentiment on the inside of the card is from the Pink By Design Set You're a Hoot! I have attached a link where I bought mine, if you're interested!
Tuesday, October 30, 2012
Halloween Treat Bags
Wow!!! It has been forever! Life suddenly got VERY busy! I thought with two of my three children in school things would slow down...not so! I hope winter will bring a slower pace (yeah right!). My husband and I also took a trip back east to Rhode Island, just the two of us, it was soooo fun. It was business for him, but I got to play!!!
It felt so good to get back to crafting! I made some Halloween treat bags to take around to a few ladies that I go to church with, and here they are!

I tried to throw these together quick late last night, but I must be out of practice because it was not quick!!! But I enjoyed every minute! The patterned paper is from DCWV Fall Glitter stack and the rest of the paper is scraps from my stash. The cute candy corn is from Paper Piecings by Nikki and was cut on my Silhouette at 3". I tried to make the cute faces like Nikki's but it was a NO go! I finally ended up using my Peachy Keen Stamps - The Cornies 1 1/8". I also used My Pink Stampers Happiest Moments stamp set for the "Happy Halloween" sentiment.

Here they all are together!!! I used Candy Corn, Indian Corn and
Caramel Apple Taffy!!! Happy Halloween!!
I am entering this in the following challenges:
Cameo Creations Halloween Treats Challenge
Pause Dream Enjoy Candy Challenge
My Craft Spot Too Cute to Spook Challenge
Cameo Creations Halloween Treats Challenge
Pause Dream Enjoy Candy Challenge
My Craft Spot Too Cute to Spook Challenge
Wednesday, August 22, 2012
Thanks a Melon!
Another cute SVG from Treasure Box Designs!!!

I cut this out using my new Silhouette Cameo!!! Yay!!!! The paper and ink used for this card is all from Stampin' Up! The color combo is Melon (Melon Mambo), Rind (Old Olive and Certainly Celery), Bear (Soft Suede) and Background (Tempting Turqouise). The embossing in the background was done using my Cuttlebug and an embossing folder from the Once Upon a Princess 4-pack. I think she may need a bow!
I have entered this project in the Getting Cricky-Fun With Puns!!! Challenge.
I have entered this project in the Getting Cricky-Fun With Puns!!! Challenge.
Tuesday, August 21, 2012
FRANKS so much!!!
My twelve year old son needed a thank you card...and this is his invention!!!

The cute frankenstein is from the Mini Monsters Cricut Cartridge and was cut at 5 1/2". The polka dot paper is from SEI and the purple and green are from Stampin' Up (Eggplant Envy, Certainly Celery and Wild Wasabi). The black and gray card stock are from my stash!! The cute face was stamped using Peachy Keens Make A Monster Face 1 1/8" stamps. The cute sentiment is an original from my twelve year old!!!
I am entering this card in the Cardz TV Challenge #82 Polka Dots and
Getting Cricky - Fun With Puns!!!
Pause Dream Enjoy Challenge #34 UFO's and Monster in the Closet
I am entering this card in the Cardz TV Challenge #82 Polka Dots and
Getting Cricky - Fun With Puns!!!
Pause Dream Enjoy Challenge #34 UFO's and Monster in the Closet
Friday, August 3, 2012
Bubble Blanket
Thought I would share with you the baby blanket I crocheted for my niece!!! It is called a Baby Bubble Blanket and I learned how to make it from a video on YouTube. Don't you just love YouTube???

Here is a link to the YouTube video I used
It is a very simple pattern (If I can do it...anyone can)!!!
Cute New Graphics
Here is a cute new graphics site I know you will love!!!

Thursday, August 2, 2012

Saturday, July 28, 2012
Diaper Cake
I decided to try my hand at making a diaper cake for my cousins baby shower. It was not at all difficult, although a little pricey. Luckily my mother and my sisters-in-law went in on it with me so it wasn't too bad!!
(When did baby toys get so expensive???)

I started the base with baby powder, baby soap and baby lotion, I wrapped those with an elastic and then started to place the diapers in the elastic with them, there are 3 rows. I bought a box of size 1 diapers which had 108 diapers included and used every single one of them. Each diaper is rolled from the open end down and then has an elastic placed around it (I used the little invisible elastics that you use for little girls hair). Repeat the process with the second row, there are two rows. And last but not least the top row. Each row has ribbon around it, I pinned it then hot glued it on the overlapping ends, looks like I need to adjust it so it is even all the way around :). We placed a blanket and teddy bear at the top (we have a dowel running between the blanket into the diapers to get it attached), and then little toys around it.

Kinda fun!!! Hope she likes it!!!
Tuesday, July 17, 2012
You make me Smile!
This card was made from the Cricut Cartridges: Sesame Street Holidays, Best of Pixar, and Paper Dolls for Everyday. All of the paper used is from Stampin' Up! I love the quality of their paper it is thick and cuts great in the Cricut.
Elmo is cut at 5", the sun at 1.71", the cloud at 4" and the sand at 1.31". I used my Gypsy to decide how big I measured each one, that is why the measurements are a little funky. Elmo and the sun are both from the Sesame Street Holidays cartridge, the cloud is from Paper Dolls For Everday, and the sand is from the Best of Pixar cartridge. The sand can be found behind Dory using the icon feature. Here is another card I made using the same sand.

The paper colors I used from Stampin' Up are: Real Red (Elmo), Pumpkin Pie (nose), Wild Wasabi (shorts and mask), and River Rock (Sand). I put Glossy Accents on Elmo's mask and flippers to make them look wet. The sand and Elmo were attached using pop dots to add dimension. The sentiment is from the Pink By Design Simply Everything stamp set.
I am entering this card in the following challenges:
Friday, July 13, 2012
Stamp Pad Organization
So here is how I have organized my Stampin' Up stamp pads.

I found this idea online, I will create a link at the bottom of this post to send you to the instructions if you are interested. This is made of foam poster board if you can believe it and is really quite sturdy. I have it in the window sill above my craft table and LOVE it!!! Everything is just within reach. I have my stamp pads organized according to color family and then have my other stamp pads along the right side. They will probably have to move to the bottom at some point because I would love to get the Stampin' Up In Color pads in the future. On the top I have my Ink Refills as well as my Ink dots and stamp cleaning pad. This project is time consuming and kinda tough so be prepared if you want to do it!!! Mine turned out all right, but I am somewhat of a perfectionist and it didn't go together perfectly, everything was fine until I tried to put the sides on. Have Fun!!!
Here is the website: Syzygy Of Me
If you are interested she also has instructions on how to make foam board Copic Storage :)
Thursday, July 12, 2012
Ink Dots!!!
So here is my way of saving a little extra cash when
I ordered my Stampin' Up supplies.

I already knew that I wanted to get the ink pads in the Brights, Subtles, Regals and Neutrals. I also knew that I wanted to get the ink refills that coordinate with each of the above groups. I really, really wanted the ink spots that go along with each of these too,but by now my money is getting tight, so this was my solution. I ordered this cute dauber box from scrapjazz.com and downloaded the corresponding chart from the same site. It glues right in the top of the lid. Then I ordered my extra daubers from Stampin' Up which truly was the best deal I could find. Last but not least I labeled each of the spaces in the chart with name of the ink in which I will use it with. It works out perfect. 10 slots for Brights, 10 for Subtles, 10 for Regals, and 8 for Neutrals (I also have craft white), with one to spare. I love these little daubers, they give you much more flexibility than the big ink pad does.
The box was $8 something and a package of 12 daubers (I had a few laying around) was $10.95.
I ended up saving myself about $36.
Just click on the links above to check out either item!!!

I don't know if any of you are like me...but the handwriting on the ink dot chart was driving me crazy, I like things typed, but because it was a pdf file I couldn't type in the color names. So...my husband helped me to create a table in Word.
Here is how to create one of your own.
*Create a table 8 x 5
*Highlight the table and Right Click
*Go to Table Properties
*Click Table Tab
Preferred Width: 7.25"
*Click Row Tab
Specifiy Height: .88"
*Click Colum Tab
Preferred Width: .88"
*Cell Tab
Center
*Highlight Table and Click Center Text
I used the Hobo font at size 11
*Start typing :)
I also put a dot of color on each of the color names, I am a visual person and it helps me to locate the ink dot faster!
I don't know how to put this on my webpage so others can download it, but if you want a chart pre- made with the Stampin' Up colors already filled in leave me a comment with your e-mail address and I will send it to you in an attachment!
Wednesday, July 11, 2012
Thank you BEAR-y much!!!
I had sooo much fun creating this card!!! I love my new Stampin' up supplies!!! I chose the color I wanted the bear, Soft Suede, and then looked at my color coach and found the coordinating colors, So Saffron and Regal Rose, just right for the project I wanted. Then when I felt like I needed definition or depth I had the coordinating ink to go with the paper! I loved it!!! On to the details...

This card was made from a free SVG file that I got from Treasure Box Designs. I love this site...so many cute designs. I cut all of the pieces using my Silhouette SD. The face was created using Treasure Box Face Stamps. All of the paper and ink used is from Stampin' Up. The embossing on the Regal Rose paper is a Cuttlebug folder called Perfectly Paisley. (My son wants credit for the sentiment...yes he is the one that came up with it!!!)
I am entering this project in the Monica's Creative Madness Challenge "Anything Goes"

I am entering this project in the Monica's Creative Madness Challenge "Anything Goes"
Monday, July 9, 2012
Stampin' Up Website

Yay!!! I have a Stampin' Up website!!! It is: www.creativebug.stampinup.net
I love Stampin' Up's paper, ink, crayons, markers, stamps etc. Everything is top quality. The problem always came though that when I went to order it I needed a demonstrator to order...so I became one!!! I would love to become your personal demonstrator!!! Feel free to check out my website and order!!!
Friday, June 29, 2012
Stamp Organization!
I bought some new stamps with my birthday money and thought I would show you how I organize my stamps.

I use the Clear Mount Stamp Cases from Stampin' Up.
Here is a picture of one below.
Then I remove all of the stamps from there backing
and place them inside the stamp case.

I put adhesive on each side of the front sheet from the stickers with my ATG gun and center it in the front sleeve of the stamp case.

I then realign my stamps (as needed) so that they match up with the
front sheet which is labeled.
front sheet which is labeled.
Next, I make a label with my label maker
to put on the spine of the stamp case.
to put on the spine of the stamp case.

And last I put it in my drawer with my other stamps!!!

I liked this solution because I don't have a lot of counter space in my craft area and could never use a clip it up or other similar item. Hope you like it.
If you are interested in the stamp cases stay in touch I will soon have a Stampin' Up website where you can order them! :) They are 4/$5.95.
If you are interested in the stamp cases stay in touch I will soon have a Stampin' Up website where you can order them! :) They are 4/$5.95.
Thursday, June 28, 2012
It's Here!!!
My Stampin' Up kit arrived today!!! Wahoo!!!

I received all of the training materials, eight 2013-2013 catalogs, eighty pieces of card stock,

10 stampin' pads, 10 bottles of reinking solution,

4 clear stamp storage boxes, dimensional adhesives, a stamp set, a digital design disk
and a pattern paper collection and more...

I CAN'T WAIT TO CREATE!!!
Wednesday, June 27, 2012
Stampin' Up Here I Come!!!
So excited!!! I signed up today to become a Stampin' Up Demonstrator!!! During the month of June it is only $99, and you receive $125 worth of merchandise. I love Stampin' Up's cardstock it is nice and thick, great quality. I also love that they have coordinating ink, ink refills (so you don't have to keep buying new pads), water color pencils, chalks, water color crayons, ink spots and markers!!! Everything you need to create all color coordinating!!! They also have adhesives, pattern paper, punches, stamps etc. I love it!!! Can't wait to get my starter kit!


Saturday, June 16, 2012
iDad-Happy Father's Day
My hubby is into techi stuff so when I saw this idea for a Father's Day card I couldn't pass it up!!!

I got this idea from She Knows. Check out the She Knows Website for detailed instructions and templates!!! The actual card is made from an 8 1/2" x 11" piece of black paper (it is kind of hard to tell with my black background. I found my images by searching the internet using google and typing in the icon I wanted (i.e. calendar app image, or contacts app image). I then sized and arranged them in my Silhouette software.

I got this idea from She Knows. Check out the She Knows Website for detailed instructions and templates!!! The actual card is made from an 8 1/2" x 11" piece of black paper (it is kind of hard to tell with my black background. I found my images by searching the internet using google and typing in the icon I wanted (i.e. calendar app image, or contacts app image). I then sized and arranged them in my Silhouette software.
I cut around each image with an exacto knife to create the flap. You can probably tell that I didn't have the steadiest hand (my time away from kids was up and I could hear them upstairs fighting...kinda threw my concentration off...or least that is what I am blaming it on ;). I then had each of the kids take a row of icons and write their dad a special message under each of the icon flaps. Hope this gives you some ideas!!!
I have entered this project in the My Craft Spot Monday Challenge!
Sunday, June 10, 2012
A Huge Thanks!!
These were created for my three year olds birthday as a thanks for all the children that came. As you can tell he is a BIG Disney Cars fan. I got the idea from My Pink Stamper, and actually really love to make these cute goodie bags.
 The bags themselves are 4x6. I bought mine at Michael's using a 40% off coupon. The white base paper is cut at 4 1/2" x 6". The black base was created using the Cricut Cartridge Disney Cars. I used my Gypsy to get it the exact size I wanted, which was 2.75" x 4". I also used this same cut HERE.
 I found the Lightning McQueen image on the Disney Clips website. I sized and copied it using my Silhouette software and then used the print and cut feature (LOVE this feature). The final touch was the sentiment which is from My Pink Stamper's Even More Punni-licious set and was stamped using Stampin' Ups Whisper White ink.


Here they all are ready to go!!!
Saturday, June 2, 2012
Always Remember
I decided to make little signs to place at the headstones of my ancestors that we visited this year on Memorial Day. Just a little something to leave behind to show that they are remembered by those who have followed them. Since my grandmother's passing two years ago, I have felt the responsibility of remembering those who have gone before.
 On each sign my family records the number of generations away we are from the person whose headstone we are placing it by. For example at my great-grandparents grave it would be 3rd/4th generations. The furthest back we have in this area is 5th/6th generations ago. Kinda fun!!! My kids have really enjoyed tracing the names back and finding their link.


I forgot to print one without our families last name so I used white out, sorry I know it doesn't look real great. I used Stampin' Up colors Real Red, Whisper White and Brilliant Blue to create this project. The shape is from my Cricut Cartridge Elegant Edges. The shape is cut at 4" using the center point feature on my Cricut, the shape is swirl found on the top row, button 5 using the shift button and the oblong creative feature. The shadow cut using Real Red is 4 1/2".
I am entering this project in the following challenges:
Wednesday, May 30, 2012
I Hope You Dance!!!
I made this for my niece who is graduating this Thursday from high school. She has danced most of her life and was on the high school drill team for three years, so that is why I used the lyrics from the song I hope you dance, by LeeAnn Womack.

The graduation caps are an idea from Joy's Life. I had a difficult time finding the right size top for my graduation cap, and finally settled on Ghirardelli squares. I tried to find the right size mold to make my own, but to no avail. The flowers are from the Cricut Cartridge Create a Critter (I love that cartridge). I used my hide contours feature on my gypsy to hide the center when I cut the flower. I glittered the four flowers that say "I hope you dance", to hopefully make them stand out a little more! I used my Xyron Creatopia to get them sticky and then used Martha Stewart glitter to make them sparkle.

I printed the lyrics on my computer and then used the center point function on my cricut to cut out the circles using the Cricut Cartridge George and Basic Shapes, only because I did not have the right size punch, in hindsight it would have been easier to by the 2" punch. Sometimes I worry about myself, why didn't I think of that earlier, Joann's has them on for 50% off! Oh well!!!
I hope she likes it and I hope when she gets the choice
to sit it out or dance in life...I hope she dances!!!
Friday, May 25, 2012
Graphic Sale!
One of my favorite graphics sites Kristi Dailey.com is having a BIG sale!!!
Thought you might like the info!!!
Notice all graphic sets are $1 and if you spend more than $10 it is another 50% off!!! Can't beat that!!!

I used her graphics and my Silhouette's print and cut feature
on these Goodie Bags, check it out.
Sale is effective until May 31.
Tuesday, May 22, 2012
You are ReMARKable!!!
I made these cards for three young women that are graduating from High School this year. I was lucky enough to teach this group of girls when they were 12/13 years old and have had the opportunity to watch these ladies grow into remarkable young women.

This card is 4 1/2 x 6 inches, the background was cut at 4 1/4 x 5 3/4 inches and was embossed with the Cuttlebug folder You. I then wrapped it background with twine (the blue and yellow is We R Memory Keepers Twine, and the Purple is The Twinery).

The cute marker is from the Lettering Delights Pop School Cut It's Set, and I cut it out with my Silhouette at approximately 6 inches. I put it on the card using pop dots. The bow is from the Cricut Cartridge Create a Critter and is found on layer 3 of the Porcupine. I used Crystal Stickles and my I-Rock tool to bling up the bow.

The adorable face is from the Basic Paper Doll Face 1" stamps from Peachy Keen. I traced over the eyes and added a white highlight with Sakura pens and finally, I added some Glossy Accents to the eyes, and some chalk to the cheeks to give them some dimension.

The inside has the definition/synonyms of remarkable.
re·mark·a·ble:
notably or conspicuously unusual;
extraordinary
worthy of notice or attention.
synonyms:
notable,
noteworthy, striking, extraordinary,
wonderful,
unusual, singular, uncommon.
I am entering this project in the My Craft Spot Monday Challenge and Fantabulous Cricut Challenge Me Monday.
Friday, May 18, 2012
Lightning McQueen
You would have to know my 2 year old to completely understand the sentiment on this card, but it fits him to a tee!!! I have a 15 year old, a 12 year old...and a 2 year old, (yeah, major break there)!!! He is stinkin' cute, but FULL of it!!!

I made this card to give to a couple that go to our same church and were in charge of his nursery class, they have since been asked to serve in a different position,but they were amazing with him and his energy! He calls them his "friends" and often yells "I love you too much" as we pass them in the halls!!!
The card was made using the Cricut Disney Cars Cartridge, both Lightning
and the background road came from this same cartridge.
Wednesday, May 16, 2012
The Big 4-0!!!
Well, it is official my hubby and I are getting old. We just celebrated my husbands 40th birthday, CRAZY!!! I created this card from the Cricut Life's A Party Cartridge. The paper is Coordinations, I bought it in the open stock at JoAnn's. I used the Cuttlebug embossing folder Traffic Jam on the grey background and then added some silver stickles to spice it up a bit. I don't know if vultures are suppose to be spicy or not??? :) And finally added some black twine!!!

I made a birthday basket for my hubby this year. "The Big 40" was also off of the Life's a Party Cartridge. I just used the fit to page feature on my Cricut Expression (I think it turned out to be 11 1/2") to cut out the phrase. I ended up gluing it to a wooden shim (the only thing I could find at the moment) so it would stick out of the basket.
SIDE NOTE: My two year old decided that he could be a big help during this project :/, so instead of taking his nap he was helping glue, tape and cut just about anything he could get his hands on and endlessly repeating "but, what about me???".
So, in the end a wooden shim didn't sound so bad!!! :) Anybody else have crafting days like these?

Tuesday, May 15, 2012
You Are My Super Hero!!!
Made this card for my hubby for our anniversary!!! I got the idea from the Obsessed with Scrapbooking blog. Since I didn't have the Cricut Superman Cartridge at the time, I just got online and looked for free superman graphics.
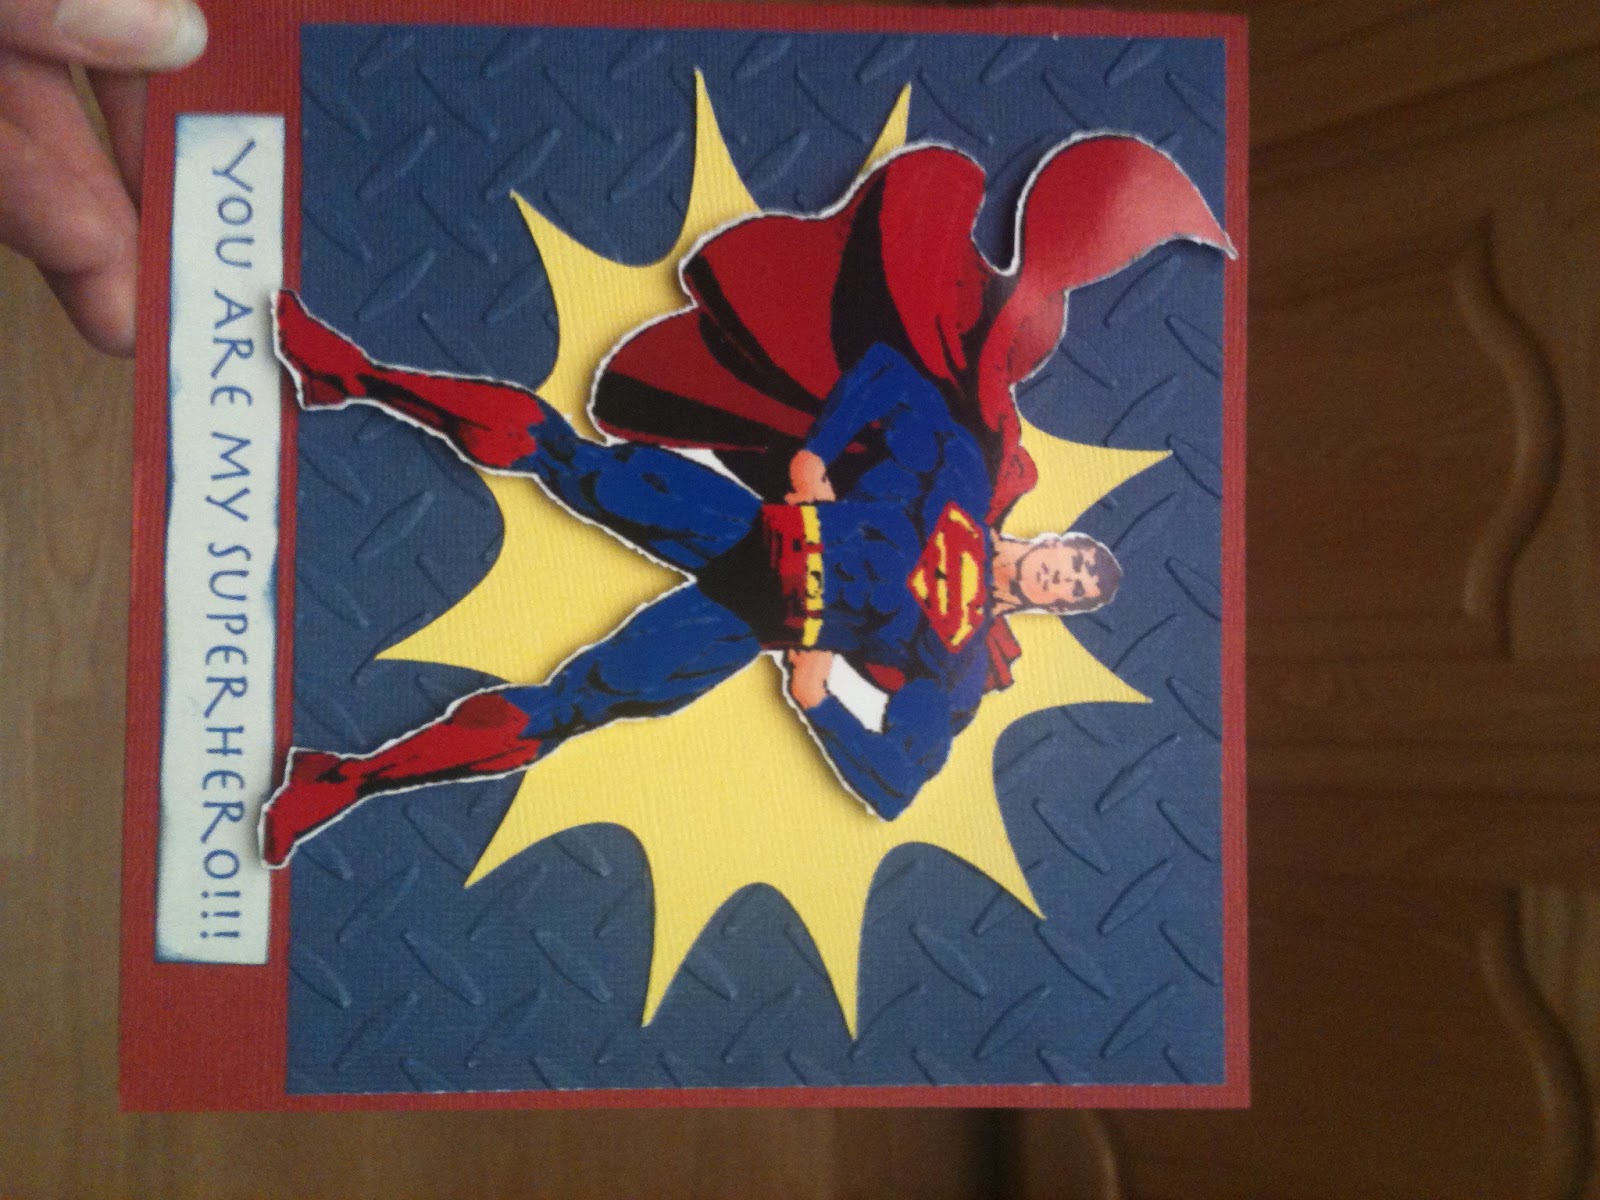
I used the print and cut feature on my Silhouette to cut out Superman. The cut itself is a little ragged. I tried to adjust the cut lines through the Silhouette Studio software, but that was WAY more than I was bargaining for and stopped. The hubby didn't seem to notice :), or was to kind to mention it!!!
I embossed the blue background with the Cuttlebug diamond folder, and the yellow burst in the background is from the Cricut Best of Pixar Cartridge!!!
Sunday, May 13, 2012
Missing you a TON!!!
This cute elephant is from Treasure Box Designs. Isn't it the cutest!!! I wanted to enter the weekly color challenge at I came, I saw, I created so I used my Silhouette Design Studio to alter the colors a bit. The ears of the elephant are Pink Pirouette, the body is Sahara Sand, and the peanut is Always Artichoke!!! I also incorporated yellow, green and coral (orange) into my project so that it qualified for the Cameo Creations Challenge. The tulip cuts are free SVG files from SVG Cuts, and the grass was a free SVG file from Little Scraps of Heaven. I used Glossy Accents on the eyes to give them the shiny, wet look and the Cuttlebug Mosaic embossing folder on the peanut to add texture.

I was WAY excited to see that I could alter the colors on this SVG file, I just went to the fill screen and chose advanced options (at the bottom) and from there it let me enter my own RGB codes. I printed it out on white textured card stock and then used my print and cut feature to cut out the shapes on my Silhouette. The white cloud at the top is from the Cricut Cartridge Paper Dolls for Everyday.

Subscribe to:
Posts (Atom)