Friday, June 29, 2012

Stamp Organization!

I bought some new stamps with my birthday money and thought I would show you how I organize my stamps.


I use the Clear Mount Stamp Cases from Stampin' Up.  
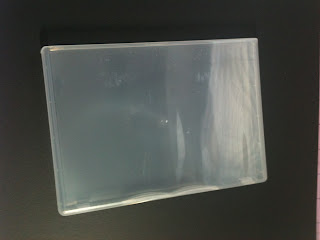
Here is a picture of one below.


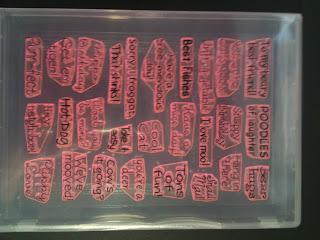
Then I remove all of the stamps from there backing 
and place them inside the stamp case.


I put adhesive on each side of the front sheet from the stickers with my ATG gun and center it in the front sleeve of the stamp case.


I then realign my stamps (as needed) so that they match up with the
front sheet which is labeled.


Next, I make a label with my label maker
 to put on the spine of the stamp case.


And last I put it in my drawer with my other stamps!!!


I liked this solution because I don't have a lot of counter space in my craft area and could never use a clip it up or other similar item.  Hope you like it.
 If you are interested in the stamp cases stay in touch I will soon have a Stampin' Up website where you can order them! :)  They are 4/$5.95.

Thursday, June 28, 2012

It's Here!!!

My Stampin' Up kit arrived today!!! Wahoo!!!


I received all of the training materials, eight 2013-2013 catalogs, eighty pieces of card stock, 


10 stampin' pads, 10 bottles of reinking solution,


 4 clear stamp storage boxes, dimensional adhesives, a stamp set, a digital design disk 
and a pattern paper collection and more...
I CAN'T WAIT TO CREATE!!!

Wednesday, June 27, 2012

Stampin' Up Here I Come!!!

So excited!!!  I signed up today to become a Stampin' Up Demonstrator!!!  During the month of June it is only $99, and you receive $125 worth of merchandise.  I love Stampin' Up's cardstock it is nice and thick, great quality.  I also love that they have coordinating ink, ink refills (so you don't have to keep buying new pads), water color pencils, chalks, water color crayons, ink spots and markers!!!  Everything you need to create all color coordinating!!!  They also have adhesives, pattern paper, punches, stamps etc.   I love it!!! Can't wait to get my starter kit!

Saturday, June 16, 2012

iDad-Happy Father's Day

My hubby is into techi stuff so when I saw this idea for a Father's Day card I couldn't pass it up!!!


I got this idea from She Knows.  Check out the She Knows Website for detailed instructions and templates!!!  The actual card is made from an 8 1/2" x 11" piece of black paper (it is kind of hard to tell with my black background.  I found my images by searching the internet using google and typing in the icon I wanted (i.e. calendar app image, or contacts app image).  I then sized and arranged them in my Silhouette software.
I cut around each image with an exacto knife to create the flap.  You can probably tell that I didn't have the steadiest hand (my time away from kids was up and I could hear them upstairs fighting...kinda threw my concentration off...or least that is what I am blaming it on ;).  I then had each of the kids take a row of icons and write their dad a special message under each of the icon flaps.  Hope this gives you some ideas!!!

I have entered this project in the My Craft Spot Monday Challenge!

Sunday, June 10, 2012

A Huge Thanks!!

These were created for my three year olds birthday as a thanks for all the children that came.  As you can tell he is a BIG Disney Cars fan.  I got the idea from My Pink Stamper, and actually really love to make these cute goodie bags.
The bags themselves are 4x6.  I bought mine at Michael's using a 40% off coupon.  The white base paper is cut at 4 1/2" x 6".  The black base was created using the Cricut Cartridge Disney Cars.  I used my Gypsy to get it the exact size I wanted, which was 2.75" x 4".  I also used this same cut HERE.
I found the Lightning McQueen image on the Disney Clips website.  I sized and copied it using my Silhouette software and then used the print and cut feature (LOVE this feature).  The final touch was the sentiment which is from My Pink Stamper's Even More Punni-licious set and was stamped using Stampin' Ups Whisper White ink.
Here they all are ready to go!!!  

Saturday, June 2, 2012

Always Remember

I decided to make little signs to place at the headstones of my ancestors that we visited this year on Memorial Day.  Just a little something to leave behind to show that they are remembered by those who have followed them.  Since my grandmother's passing two years ago, I have felt the responsibility of remembering those who have gone before.
 On each sign my family records the number of generations away we are from the person whose headstone we are placing it by.  For example at my great-grandparents grave it would be 3rd/4th generations.  The furthest back we have in this area is 5th/6th generations ago.  Kinda fun!!!  My kids have really enjoyed tracing the names back and finding their link.
I forgot to print one without our families last name so I used white out, sorry I know it doesn't look real great.  I used Stampin' Up colors Real Red, Whisper White and Brilliant Blue to create this project.  The shape is from my Cricut Cartridge Elegant Edges.  The shape is cut at 4" using the center point feature on my Cricut, the shape is swirl found on the top row, button 5 using the shift button and the oblong creative feature.  The shadow cut using Real Red is 4 1/2".  

I am entering this project in the following challenges: