Saturday, June 16, 2012

iDad-Happy Father's Day

My hubby is into techi stuff so when I saw this idea for a Father's Day card I couldn't pass it up!!!


I got this idea from She Knows.  Check out the She Knows Website for detailed instructions and templates!!!  The actual card is made from an 8 1/2" x 11" piece of black paper (it is kind of hard to tell with my black background.  I found my images by searching the internet using google and typing in the icon I wanted (i.e. calendar app image, or contacts app image).  I then sized and arranged them in my Silhouette software.
I cut around each image with an exacto knife to create the flap.  You can probably tell that I didn't have the steadiest hand (my time away from kids was up and I could hear them upstairs fighting...kinda threw my concentration off...or least that is what I am blaming it on ;).  I then had each of the kids take a row of icons and write their dad a special message under each of the icon flaps.  Hope this gives you some ideas!!!

I have entered this project in the My Craft Spot Monday Challenge!

Sunday, June 10, 2012

A Huge Thanks!!

These were created for my three year olds birthday as a thanks for all the children that came.  As you can tell he is a BIG Disney Cars fan.  I got the idea from My Pink Stamper, and actually really love to make these cute goodie bags.
The bags themselves are 4x6.  I bought mine at Michael's using a 40% off coupon.  The white base paper is cut at 4 1/2" x 6".  The black base was created using the Cricut Cartridge Disney Cars.  I used my Gypsy to get it the exact size I wanted, which was 2.75" x 4".  I also used this same cut HERE.
I found the Lightning McQueen image on the Disney Clips website.  I sized and copied it using my Silhouette software and then used the print and cut feature (LOVE this feature).  The final touch was the sentiment which is from My Pink Stamper's Even More Punni-licious set and was stamped using Stampin' Ups Whisper White ink.
Here they all are ready to go!!!  

Saturday, June 2, 2012

Always Remember

I decided to make little signs to place at the headstones of my ancestors that we visited this year on Memorial Day.  Just a little something to leave behind to show that they are remembered by those who have followed them.  Since my grandmother's passing two years ago, I have felt the responsibility of remembering those who have gone before.
 On each sign my family records the number of generations away we are from the person whose headstone we are placing it by.  For example at my great-grandparents grave it would be 3rd/4th generations.  The furthest back we have in this area is 5th/6th generations ago.  Kinda fun!!!  My kids have really enjoyed tracing the names back and finding their link.
I forgot to print one without our families last name so I used white out, sorry I know it doesn't look real great.  I used Stampin' Up colors Real Red, Whisper White and Brilliant Blue to create this project.  The shape is from my Cricut Cartridge Elegant Edges.  The shape is cut at 4" using the center point feature on my Cricut, the shape is swirl found on the top row, button 5 using the shift button and the oblong creative feature.  The shadow cut using Real Red is 4 1/2".  

I am entering this project in the following challenges:

Wednesday, May 30, 2012

I Hope You Dance!!!


I made this for my niece who is graduating this Thursday from high school.  She has danced most of her life and was on the high school drill team for three years, so that is why I used the lyrics from the song I hope you dance, by LeeAnn Womack.


The graduation caps are an idea from Joy's Life.  I had a difficult time finding the right size top for my graduation cap, and finally settled on Ghirardelli squares.  I tried to find the right size mold to make my own, but to no avail.  The flowers are from the Cricut Cartridge Create a Critter (I love that cartridge).  I used my hide contours feature on my gypsy to hide the center when I cut the flower.  I glittered the four flowers that say "I hope you dance", to hopefully make them stand out a little more!  I used my Xyron Creatopia to get them sticky and then used Martha Stewart glitter to make them sparkle.
I printed the lyrics on my computer and then used the center point function on my cricut to cut out the circles using the Cricut Cartridge George and Basic Shapes, only because I did not have the right size punch,  in hindsight it would have been easier to by the 2" punch.  Sometimes I worry about myself, why didn't I think of that earlier, Joann's has them on for 50% off!  Oh well!!!

I hope she likes it and I hope when she gets the choice 
to sit it out or dance in life...I hope she dances!!!

Friday, May 25, 2012

Graphic Sale!

One of my favorite graphics sites Kristi Dailey.com is having a BIG sale!!! 
Thought you might like the info!!!
Notice all graphic sets are $1 and if you spend more than $10 it is another 50% off!!! Can't beat that!!!
I used her graphics and my Silhouette's print and cut feature 
on these Goodie Bags, check it out.
Sale is effective until May 31.

Tuesday, May 22, 2012

You are ReMARKable!!!

I made these cards for three young women that are graduating from High School this year.  I was lucky enough to teach this group of girls when they were 12/13 years old and have had the opportunity to watch these ladies grow into remarkable young women.


This card is 4 1/2 x 6 inches, the background was cut at 4 1/4 x 5 3/4 inches and was embossed with the Cuttlebug folder You.  I then wrapped it background with twine (the blue and yellow is We R Memory Keepers Twine, and the Purple is The Twinery).  


The cute marker is from the Lettering Delights Pop School Cut It's Set, and I cut it out with my Silhouette at approximately 6 inches.  I put it on the card using pop dots.  The bow is from the Cricut Cartridge Create a Critter and is found on layer 3 of the Porcupine.  I used Crystal Stickles and my I-Rock tool to bling up the bow.  

The adorable face is from the Basic Paper Doll Face 1" stamps from Peachy Keen.  I traced over the eyes and added a white highlight with Sakura pens and finally, I added some Glossy Accents to the eyes, and some chalk to the cheeks to give them some dimension.

The inside has the definition/synonyms of remarkable.
re·mark·a·ble:
notably or conspicuously unusual; extraordinary
worthy of notice or attention.
synonyms:
notable, noteworthy, striking, extraordinary,
wonderful, unusual, singular, uncommon.

Friday, May 18, 2012

Lightning McQueen

You would have to know my 2 year old to completely understand the sentiment on this card, but it fits him to a tee!!!  I have a 15 year old, a 12 year old...and a 2 year old, (yeah, major break there)!!!  He is stinkin' cute, but FULL of it!!!  

I made this card to give to a couple that go to our same church and were in charge of his nursery class, they have since been asked to serve in a different position,but they were amazing with him and his energy!  He calls them his "friends" and often yells "I love you too much" as we pass them in the halls!!!  
The card was made using the Cricut Disney Cars Cartridge, both Lightning 
and the background road came from this same cartridge.  

Wednesday, May 16, 2012

The Big 4-0!!!

Well, it is official my hubby and I are getting old.  We just celebrated my husbands 40th birthday, CRAZY!!!  I created this card from the Cricut Life's A Party Cartridge.  The paper is Coordinations, I bought it in the open stock at JoAnn's.  I used the Cuttlebug embossing folder Traffic Jam on the grey background and then added some silver stickles to spice it up a bit.  I don't know if vultures are suppose to be spicy or not??? :) And finally added some black twine!!!

I made a birthday basket for my hubby this year.  "The Big 40" was also off of the Life's a Party Cartridge.  I just used the fit to page feature on my Cricut Expression (I think it turned out to be 11 1/2") to cut out the phrase.  I ended up gluing it to a wooden shim (the only thing I could find at the moment) so it would stick out of the basket.  
SIDE NOTE:  My two year old decided that he could be a big help during this project :/, so instead of taking his nap he was helping glue, tape and cut just about anything he could get his hands on and endlessly repeating "but, what about me???".  
So, in the end a wooden shim didn't sound so bad!!! :)  Anybody else have crafting days like these?

Tuesday, May 15, 2012

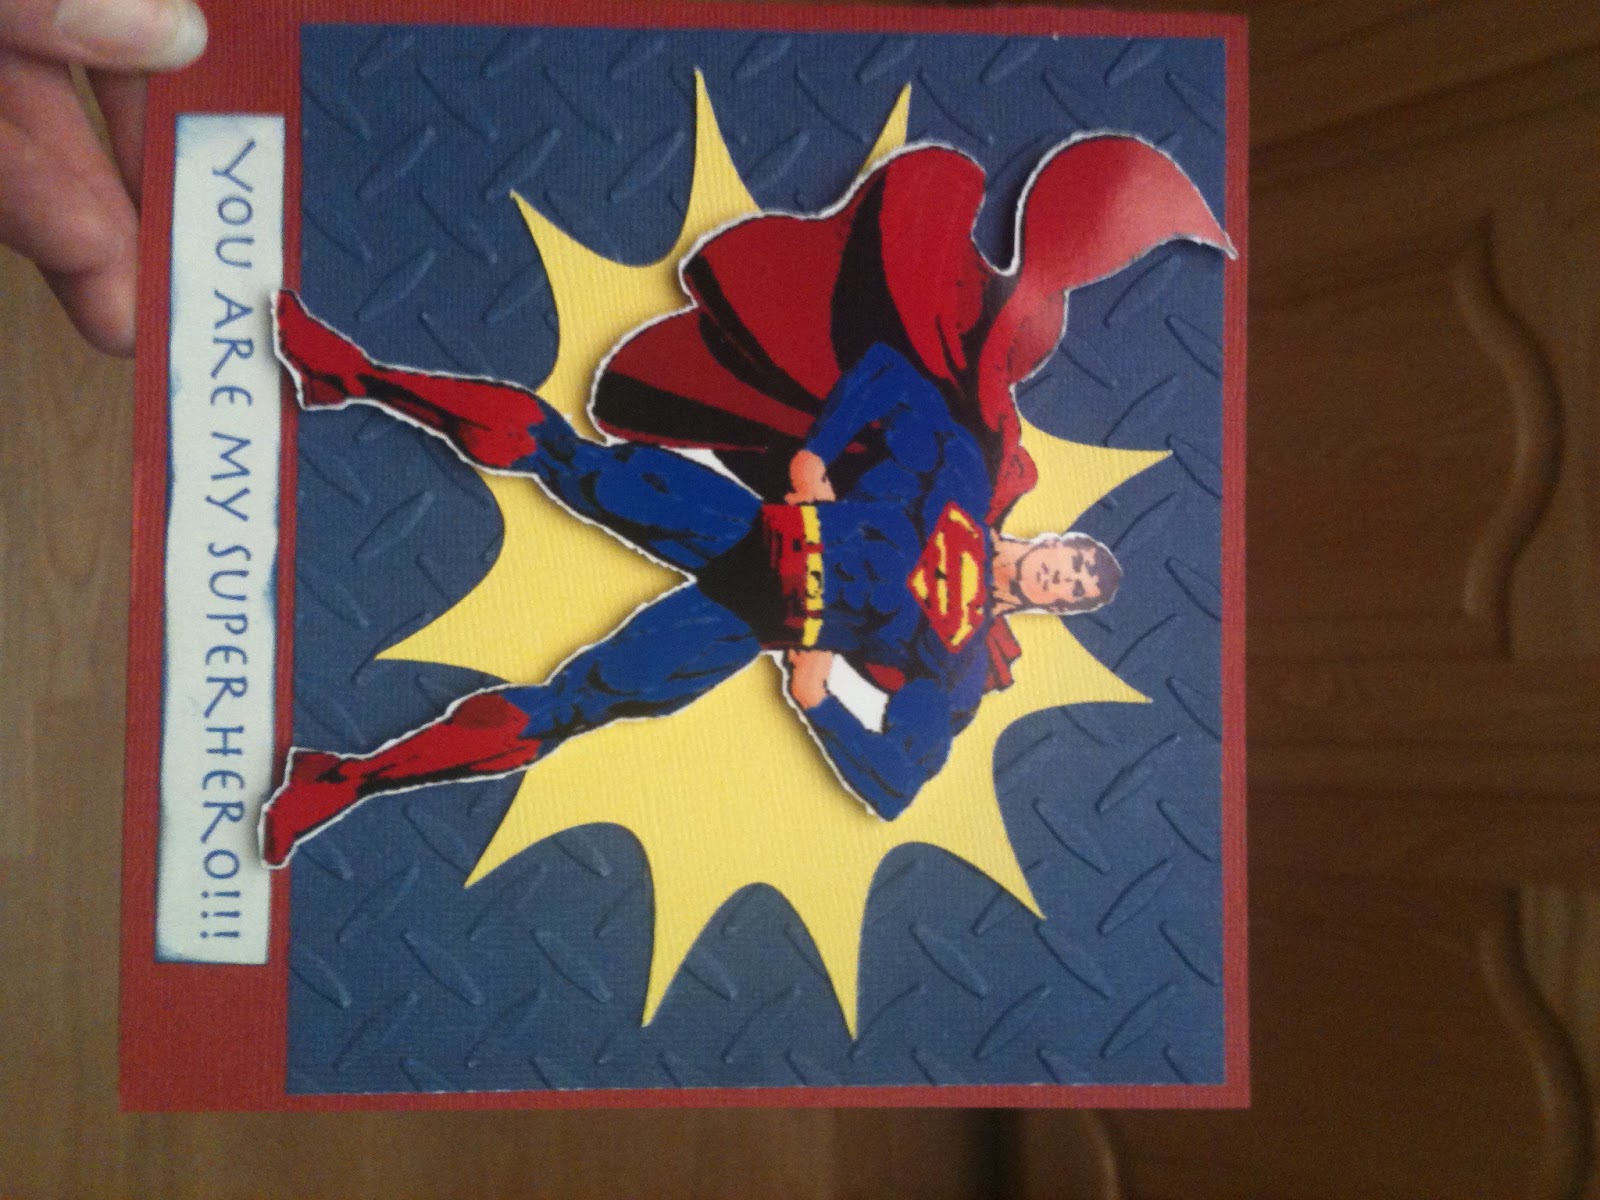
You Are My Super Hero!!!

Made this card for my hubby for our anniversary!!!  I got the idea from the Obsessed with Scrapbooking blog.  Since I didn't have the Cricut Superman Cartridge at the time, I just got online and looked for free superman graphics.

I used the print and cut feature on my Silhouette to cut out Superman.  The cut itself is a little ragged.  I tried to adjust the cut lines through the Silhouette Studio software, but that was WAY more than I was bargaining for and stopped.  The hubby didn't seem to notice :), or was to kind to mention it!!!
I embossed the blue background with the Cuttlebug diamond folder, and the yellow burst in the background is from the Cricut Best of Pixar Cartridge!!!

Sunday, May 13, 2012

Missing you a TON!!!

This cute elephant is from Treasure Box Designs.  Isn't it the cutest!!!  I wanted to enter the weekly color challenge at I came, I saw, I created so I used my Silhouette Design Studio to alter the colors a bit.  The ears of the elephant are Pink Pirouette, the body is Sahara Sand, and the peanut is Always Artichoke!!!  I also incorporated yellow, green and coral (orange) into my project so that it qualified for the Cameo Creations Challenge.  The tulip cuts are free SVG files from SVG Cuts, and the grass was a free SVG file from Little Scraps of Heaven.  I used Glossy Accents on the eyes to give them the shiny, wet look and the Cuttlebug Mosaic embossing folder on the peanut to add texture.

I was WAY excited to see that I could alter the colors on this SVG file, I just went to the fill screen and chose advanced options (at the bottom) and from there it let me enter my own RGB codes.  I printed it out on white textured card stock and then used my print and cut feature to cut out the shapes on my Silhouette. The white cloud at the top is from the Cricut Cartridge Paper Dolls for Everyday.